Crane only moves at slowest speed with all functions

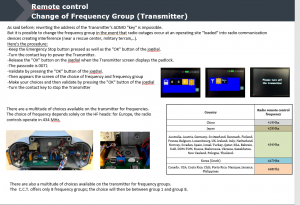
Customer was operating MDT crane with remote, but all functions were slow.  Had the following icon on the display of the remote:

Crane was in P+ mode, which allows for greater capacity, but slows function.  On the remote this is controlled with ” A-B ” switch.

In the cab this is controlled by the gray button on the top of the left joystick.

Checking Power Supply on Hup Models

Turn multimeter to the V setting for voltage (If your meter differs, choose the V with the wave symbol and range to 500V)

Locate the G4 junction block on the right side of the control panel above the circuit breakers on the bottom.  Install black lead from your meter into the green and yellow block

**CAUTION**  only hold the red test lead by the plastic portion near the wire lead.  You are checking high voltage and high amperage and injury could result.

Locate the filter in the right of the of the control panel.  It is labelled C100F

Test voltage of L1 to Ground

Test voltage of L2 to Ground

Test voltage of L3 to Ground

Test voltage of L1 to L2

Test voltage of L2 to L3

Test voltage of L1 to L3

Explanation of Push Button Remote

The top button is the start button (line with horn icon)

The bottom button is the horn only

The top button is the swing brake

The bottom button is the rope reeving change button

The toggle switch is for erection and work mode (to the left is jib, right is mast, center is work)

The red button is the emergency stop (its spring loaded and should pop back up after being pushed)

Top series of buttons is hoist

2nd from the top is trolley

3rd is swing

4th is travel

Motor Encoder shuts down crane when fails

Change the parameter in the slew drive to warning instead of fault.

  • Make sure the crane is powered off
  • Connect remote to Ethernet cable and the other end to the top of the ACS 380 drive
  • Start crane
  • Select MENU
  • Select PARAMETERS
  • Go to menu 96 and select menu 96.02 (Pass Code)
  • Enter code <8528>
  • ESC back to menu 90.45 (Motor Feedback)
  • Change 90.45 to WARNING (1)
  • ESC back to menu list
  • Verify Menu 96.10=4 (work)
  • Go to Menu 96.11 and select Option 18 (be sure it is 18!!!!)
  • Allow change to save to drive
  • Go back to 96.11 and select Option 1

HUP Radio Remote How to check working order of remote

Checking working order of HUP Joysticks

This explanation is not correct.  In order to test the switches and joysticks of the remote, you must do the following in order.

  • Turn key off
  • Depress Emergency Stop Switch
  • Press and hold ESC button next to jog dial
  • Turn key back on
  • Continue holding ESC button until the proper diagnostic screen is displayed
  • Twist Emergency Stop Switch until it pops back up
  • Now you should have proper display of the working order of the switched and joystick